
1. NestJS Lifecycle?
NestJS의 Lifecycle을 먼저 확인해 보도록 하겠다.
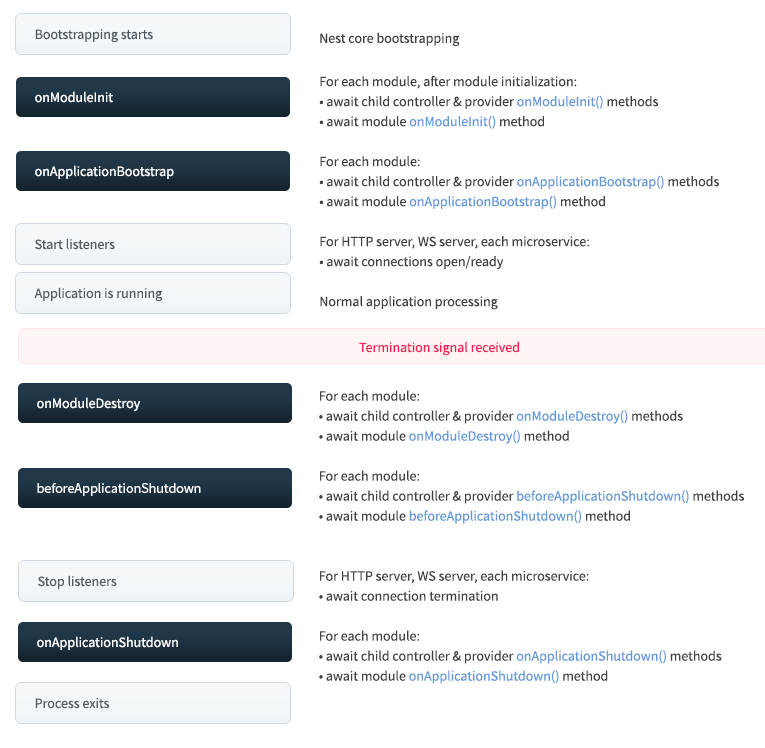
Lifecycle에 나온 메소드들을 살펴보자. (공식 문서의 내용)
| Lifecycle hook method | Lifecycle event triggering the hook method call |
| onModuleInit() | Called once the host module's dependencies have been resolved. 호스트 모듈의 종속성이 해결되면 호출됩니다. |
| onApplicationBootstrap() | Called once all modules have been initialized, but before listening for connections. 모든 모듈이 초기화되면 연결을 수신 대기하기 전에 호출됩니다. |
| onModuleDestroy() | Called after a termination signal has been received. 종료 신호가 수신된 후 호출됩니다. |
| beforeApplicationShutdown() | Called after all handlers have completed (Promises resolved or rejected) 모든 처리기가 완료된 후에 호출됩니다. once complete (Promises resolved or rejected) , all existing connections will be closed ( called) onModuleDestroy() app.close() 완료되면 기존의 모든 연결이 닫힙니다. |
| onApplicationShutdown() | Called after connections close ( resolves). app.close() 연결이 닫힌 후 호출됩니다. |
이제 각자 원하는 타이밍을 후킹하려면 어떤 메소드를 상속받아야 하는지 알 것이다.
서버 시작시에 전역변수를 설정하기 위해 여기서는 onModuleInit 메소드를 사용해 보겠다.
2. OnModuleInit
먼저 OnModuleInit을 상속받아 전역변수를 설정해줄 Service를 먼저 작성했다.
config-server.service.ts
import { Injectable, OnModuleInit } from "@nestjs/common";
import { ConstantsInitQuery } from "../const/contants-init.queries";

export var CONFIG = {};

@Injectable()
export class ConfigServerService implements OnModuleInit{
    constructor(
        public constantsInitQuery : ConstantsInitQuery
    ){}

    async onModuleInit() {
        const config =  await this.constantsInitQuery.getConfig();

        const result = {};
        config.forEach(column => {
            result[column["CONFIG_KEY"]] = column["CONFIG_VALUE"];
        });

        CONFIG = result;
    }
}
전역변수와 OnModuleInit 관련 코드를 다 작성하였다면, 이제
해당 서비스를 사용하겠다라고 선언하기 위해 modules 파일을 작성한다.
config-server.modules.ts
import { Module } from "@nestjs/common";
import { JwtModule } from "@nestjs/jwt";
import { SequelizeModule } from "@nestjs/sequelize";
import { JwtStrategy } from "src/auth/jwt.strategy";
import { ConstantsInitQuery } from "src/const/contants-init.queries";
import { COMMON } from "src/entitys/common.model";
import { ConfigServerService } from "./config-server.service";

@Module({
  imports: [
    SequelizeModule.forFeature([COMMON]),
    JwtModule.register({
      secret: `${process.env.JWT_TOKEN_SECRET}`,
      signOptions: { expiresIn: '24h' },
    }),
  ],
  providers: [
    JwtStrategy,
    ConfigServerService,
    ConstantsInitQuery,
  ],
  exports: [ConfigServerService],
  controllers: [],
})

export class ConfigServerModule{}
마지막으로 해당 모듈을 사용하겠다고 app.module.ts에 추가 해준다.
initSequelizeCLS();

@Module({
  imports: [
    ConfigModule.forRoot({
      envFilePath: ['.env', '.code'],
    }),
    SequelizeModule.forRoot({
      ...
    }),
    ...

    ConfigServerModule
  ],
  controllers: [AppController],
  providers: [AppService,
    {
      ...
    },
  ],
  exports: [
    ...
  ]
})
export class AppModule { }
이렇게하면 손쉽게 서버를 시작할때 전역변수를 설정할 수 있게 된다.
반응형